Here's my ligthbox setup for smoke:

I've got a desk lamp and a slaved flash on the outside and a stick of vanilla incense with a black foam board background on the inside. People my not believe me, but I'm certain that the flavor matters :)
I think there are a couple of changes that I need to make though
- I really need much better light. the flash on the right is ok, but the lamp is pathetic. Stronger light would really help the smoke stand out more and would let my play around more with settings on the camera - especially faster shutter speeds
- I think I probably should have cut up the box lengthwise. The thing is that I'm getting a little more of the background in focus than I'd like. Part of that is because I'm not using a light sucking black fabric or something, but I think more length would really take the background way out of my focus area.Maybe I can bring the incense out a little further...
Ok, so I shot a couple quick ones so we could play with the photoshop side of this thing. The smoke is so finicky, and it moves so fast that I usually take a lot of shots to get one or two that have a couple of interesting parts. Click your lens onto manual focus and move the lens around to find the eddies. Don't worry too much if it seems you're getting a lot out of focus.
Here's a I got shot out right off the card:

Interesting but we can do better. I'll bring it into photoshop and crop it up to isolate the lower right hand corner.
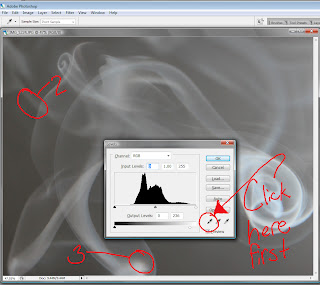
The most fun is fixing the levels (Ctrl-L)

First click on the little eyedropper with black ink. That'll tell photoshop that you are going to select what you want to be the blackest of the black in your image. I would chose the little section marked 2 in the image. Then click the eyedropper with white ink and select the part of your image that you want to be the whitest of white - I picked the part marked #3, but it would probably be better to choose the part under "Click" in the photo up there. Play around with this a lot and you'll get a lot of fun possibilities.
That'll give you something like this image which has a nice black background (although I'd like it a little more black in the upper right), and a really fun near-oversaturation in the curls down on the lower right :

Which is fun, but we can make it more fun. I accidentally shot this with an ISO of 400, so it's noisy. I'll do a little smart blur to even it out a bit.
The color is easy. Just go to the color balance (Ctrl-B) and fiddle with the bars until you dig it. I thought the green worked well

The other thing you can do is color invert the image (Ctrl-I) before (or after) you fiddle with the color balance. That gave me a fun purple

Then you save it and pop it up on flickr and your 365 blog and it's your daily photo and a how-to walkthrough!
Like I said, I'm still not happy with a lot of the process and I think this can be made a lot better. So give it a shot and tell me how you make your smoke cool!

4 comments:
THis is so great! Thanks for posting your "how to." I'll be trying this as well. :-)
I've been wanting to try the whole smoke thing, I saw it on Flickr. So thanks for posting and easy way to do it! :o)
Wow, this is great. I've never even glanced at the setting levels thing, so that alone is probably helpful. Thanks for the walkthrough.
i'm coming in very late here, but i really think this is neat - can't wait to see what you do next.
Post a Comment